http://www.themodernquiltguild.com/

Tuesday, September 5, 2017

HANDWOVEN #3

INSPIRATION!!!  

Inspiration comes from everywhere and no where.  I am enjoying exploring hand weaving on my Rigid Heddle Loom these days.  

Recently I was the recipient of a wonderful piece of sculpture from the fabulous work of Cathy Norrell.
This is such a fine piece of intricate detail.  I keep finding beautiful facets to study and admire.
This piece inspired me to weave a scarf with some wonderful Bamboo yarn I have had in my stash for a very long time.
After warping with some heather blue acrylic, I began to weave.  I loved it!
I am really pleased with the results.  I am so pleased that I took many views of it which I will present at the end of the blog.
But, first, let me show you the inspiration piece with the finished scarf.
Isn't this just amazing?

Here are more shots of both the inspiration piece and the scarf.


What a wonderful, fun adventure I am on!!


-lilbit and sandi


Details:  Kromscki 32" Rigid Heddle, 8 Dent, Acrylic Heather Blue for Warp, Bamboo Silk for Weft

Tuesday, August 22, 2017

HANDWOVEN #2

Weaving is so much fun.  In October 2016, my art quilt guild had a program and we all made little wall hanging tapestries on a cardboard and string loom.  This led me to start exploring weaving once again.  
This is made with yarn and ribbon snippets
I began checking Pinterest posts and these led me to find some blogs of weavers.  Then came some Facebook weaving groups and, of course, Instagram.  With all of this Social Media available it is really quite easy to find inspiration and sources.  

I discovered Branch Weaving and decided to try that.


The branches were easy to find in my backyard where we trimmed our trees and bushes.
This is my most recent Branch Weaving.  It is the largest yet.  This one measures about 3 feet wide and nearly 5 feet long.
Next came the Zoom Loom.  I found this little loom through a group of Pin Loom Weavers on Facebook.


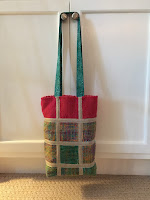
I made this tote using my first pin loom squares.

After this I learned about a Saori Weaving demonstration by Gene Black, an Alabama Artist.  I headed down to Guntersville, Alabama and had a super fun time weaving on a Saori Loom and getting tips from Gene Black.

After this afternoon, my appetite was definitely whetted for doing work on a floor loom.  I really love the Improv style of Saori as well as the meditative influence of weaving.

More posts to come . . .


-lilbit and sandi


Tuesday, July 4, 2017

HANDWOVEN #1

I have been bitten by yet another crafting bug!  This time it is weaving.  

I started out buying a 4" pin loom and starting making small 4 inch handwoven squares.  These I turned into sachet pouches filled with lavender blooms.


After I did these, I started making more squares and trying out all different weave patterns.  I want to make these into a lap blanket for my sofa.  Here are a few of the patterns I made.


 I was on a weaving group FB page and met a challenge to do a "book cover" using my weaving.
Then I bought a magazine Easy Weaving for Little Looms and found a pattern for a clutch purse.  Decided to modify the pattern and make a tote instead.  I used Silk Sari Roving as the warp and then wove the weft with acrylic knitting yarn.
Of course, I cannot forget the Branch Weaving, which got me started in the first place.
There is so much to share about each one of these kinds of weaving and I haven't even discussed floor looms yet.  I have played with those already too.  Guess there will be more blog posts to come.


                                      -sandi and lilbit


Tuesday, March 28, 2017

MARCH HAPPENINGS

March has been very busy with family activities.  Mainly, wrestling.  Our Middle School grandson is a very serious wrestler and this year he was advanced to the high school junior varsity team to wrestle in some matches at that level besides his middle school schedule.  We did not make all the matches but we did make it to the Middle School Metro where he was named Most Outstanding Wrestler and to the High School State Tournament where he placed in his weight class.  So proud of him!

With some time left over, I did accomplish a few things in my studio.


This is a paper pieced wall hanging using the freezer paper method  of foundation paper piecing. 

This fun little piece is made of leftover "scraps" from a larger project.  The binding is not complete, but maybe that will be completed before March totally ends.  
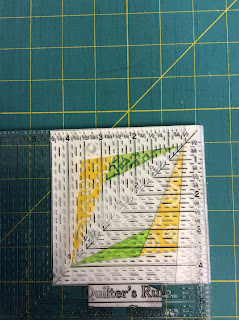
Modern Quilt Guild Mini Swap was so much fun!  This is Foundation Paper Piecing using Freezer Paper.


I have a monthly subscription to Darn Good Yarn Mystery Box.  Each month there is a wonderful skein of something with a paper and a little surprise gift.  In March I received a skein of Silk Sari Roving.  I tried to knit with it and that was not a good idea.  It would simply shred too much.  Then I decided to weave with it on my Zoom Loom.  It did the same thing.  So, on my third attempt to use this beautiful roving, I chose to warp my Zoom Loom with it and then weave with another yarn.  That was the answer!

Several of these squares are made with  the Sari Roving.  This is the beginning of a woven table runner for my back porch dining table.


Another fun project with the Zoom Loom was making Lavender Sachets for drawers and closets.

I love playing with this little loom.


A friend loaned me her HFS Washcloth Square Loom to play with.  So, of course, I made a "washcloth" except that I will use it as a dish cloth.


This is pretty cool weaving on the diagonal.


The month is coming to a close and I know there were a few other things I worked on as well as doing a little gardening.  I guess that will have to be another post later.
Happy Spring!!


-sandi and lilbit


Sunday, February 26, 2017

2017 OFF TO A GOOD START

2017 started off with a major clean up of my studio and all the closets in my home.  This was an overwhelming task.  Only a few small creative pieces were done in the month of January.

These are samples of the cleaning chaos at my house during that month.
Just one of the closets in the Studio
Dining Room furniture clean out

 So this is where it started.  I spent several weeks working on this.  
In the meantime, I was not creating much until one day I gave myself permission to "play" for a few hours.
So I made another scarf for Scarves for Charity Chattanooga.
 I started working on getting some of the blocks from the Kaleidoscope Kolor BOM from 2008 finished.
 AND, I began looking over some of my Christmas gifts to get ideas to start doing some Loom Weaving Projects.
Now, my house is finally in order and painted and I will begin to post more about my adventures in quilting, crafting, travel, and painting.


                                     -sandi


Friday, December 16, 2016

NO-RIP FOUNDATION PAPER PIECING

Foundation Paper Piecing is a wonderful technique for precise piecing.  However, the tedium of ripping all the paper off the back when finished makes some of us opt out of using the technique.

I was excited to find a way to do Foundation Paper Piecing without sewing through the paper.  Freezer paper is a notion that I keep in my sewing tool box for lots of uses.  This time I am using it to create my foundation for paper piecing.

This is not intended to be a tutorial, but, rather, it is a series of pictures to show you how I paper piece.

The tools I begin with include the pattern, a postcard or two, a rotary cutter for paper and a rotary cutter for fabric, a ruler for straight edges.


I use freezer paper to make my patterns.  First step is to create a sheet of freezer paper to run through the printer to copy the pattern onto.  Iron a sheet of printer copy paper to the shiny side of freezer paper cut to the 8.5" x 11" size of printer paper. Take your paper piecing pattern to the copier and make the number of copies you need for your project.
         

                 Tip:  I mark the corner of the freezer

paper side with an X so that I load it correctly in my printer.

After I cut out my paper piecing pattern I am ready to start adding my fabric pieces to make the block.  


Press piece #1 onto the freezer paper side and lightly press.  Turn back the pattern on the line between #1 and #2 and crease. I use a postcard to get a crisp crease.  I use an Add-a-Quarter Ruler to trim off the fabric.  
Add fabric # 2 by lining it up with the edge of fabric #1 that you trimmed above and take the project to the sewing machine and stitch the first seam by stitching next to the paper and not through the paper.  


This is the difference between the usual method.  Stitch next to the paper.


After adding piece #2
Open out the freezer paper pattern and fingerpress the added #2 piece.  Take to the iron and press #2 piece to the freezer paper pattern.

Continue adding pieces in order by number until you have finished the block.

Turn the block over and trim to size leaving a quarter inch all around.

Peel  off the freezer paper and your block is ready to make your quilt.


Your freezer paper pattern is ready to use several more times to make the rest of your blocks.  I can use one paper pattern at least 3 times.
I hope this has been helpful.  If you have questions, leave a message in comment section and I will respond.


Credit for this pattern:  Designed by Sylvia Schaefer at http://flyingparrotquilts.com


-sandi